
Background
We have covered a few topics surrounding ATAK, including plugin development and how we can access data through the API’s offered by ATAK. In this post we are going to explore the on the wire interface, namely TAK protocol.
Originally ATAK used Curser On Target (COT) as the protocol of choice for communications. However this has been augmented with a TAK protocol based upon the Google Protobuf serialisation protocol. This provides a more efficient transfer mechanism; through the act of serialisation with Protobuf, the message is significantly reduced in size, therefore allowing more messages to be transferred within the same network capacity.
ATAK typically uses messages that are transported via a UDP multicast packet, allowing the peer to peer use of the application within tactical networks. It does have TCP modes of operation for servers, however predominantly multicast is the biggest use case.
It is important to point out that TAK protocol isn’t straightforward Protobuf, instead it has a custom message header that allows a receiving device to understand what protocol is to follow. Devices and software using the original XML messaging that are still in circulation meant it was important an ‘interoperability’ mode was used to allow use with legacy systems.
The header is simply represented by:
<magic byte><tak protocol version><magic byte><tak protocol message>The magic bytes are 0xbf in hex, and the protocol version can currently be either 00 for XML payload of 01 for Protobuf payload.
So in order to process a TAK protocol message we first need to deal with the protocol header and make a decision based on the protocol version contained in byte 2.
In this blog I am going to demonstrate how to do this using Kotlin, which could be used for either Android or Desktop use.
Building a Multicast Receiver and TAK header parser.
The first thing we need is to receive the multicast packets into our programme. So we are going to build a UDP socket that subscribes to the TAK default multicast address of 239.2.3.1 with port 6969. For this we will just use a standard Java Socket;
class TakReciever {
    fun run(){

        try{
            val group = InetAddress.getByName("239.2.3.1")
            val mSocket = MulticastSocket(6969)
            mSocket.broadcast = true
            mSocket.networkInterface = NetworkInterface.getByName("wlan2")
            mSocket.joinGroup(group)

            while (true) {
                val buffer = ByteArray(1450)
                val packet = DatagramPacket(buffer, buffer.size)

                mSocket.receive(packet)
                println("raw: ${buffer.toByteString()}")


        }catch (e: Exception){
            println("problem $e")
        }

    }
This code is simply creating a new multicast socket on port 6969 and subscribing to the 239.2.3.1 multicast group. We then fire up a continuous loop to keep receiving TAK protocol messages. Once we have received a message we can print it to the console to ensure we have indeed received what we needed:
raw: [size=1450 hex=bf01bf0a0012a0020a0b612d662d472d552d432d492a2b532d312d352d32312d363………….]Looks familiar, and satisfyingly we can spot the TAK header as discussed previously, as the bf01bf occupying the first 3 bytes of the string. We now need to isolate these bytes in order to figure out what is following. We don’t want to hard code just to use Protobuf do we!
With a bit of Kotlin magic and the When Statement we can make some easy decisions on the received data. By using the .toByteString().hex() method from the OkIo library, we can pull the Hex bytes as a String format in order to compare against, therefore we need to check if we received the magic bytes and then make a decision on the protocol version if we did indeed receive the magic bytes;
if(buffer.toByteString(0,1).hex().contentEquals("bf")
    && buffer.toByteString(2,1).hex().contains("bf")){
    when(buffer.toByteString(1,1).hex()){
        "00" -> println("COT XML received")
        "01" -> println("Protobuf received")
        else -> println("Unknown")
    }

}else{
    println("Unknown Protocol")
}
Printing to the console is fine and dandy if we want to do Hello World code, but what we need to do is isolate the Protobuf or XML payload for de-serialisation. We need to be careful here as we do not want to corrupt the Bytes present in our ByteArray.
I use a simple method in creating a new ByteArray from the original packet, but removing the first 3 bytes from packet.length by using array copy, ensuring we don’t corrupt anything;
val payload = ByteArray(packet.length-3)
System.arraycopy(packet.data, 3, payload,0,payload.size)

    if (buffer.toByteString(0, 1).hex().contentEquals("bf")
        && buffer.toByteString(2, 1).hex().contains("bf")
    ) {
        when (buffer.toByteString(1, 1).hex()) {
            "00" -> println("COT XML received")
            "01" -> deSerialiseProto(payload)
            else -> println("Unknown")
        }

    } else {
        println("Unknown Protocol")
    }
}
De-serialising Protobuf
As we can now isolate the Protobuf element of the TAK protocol, we now need to be able to turn the hex string back into the message so we can use the data included within. With Protobuf we need the original .proto files, which define the message. Fortunately, as the ATAK source code is now openly available we can grab these proto files, making life incredibly easy! You can grab these for yourself from the commocommo directory in the ATAK repo.
We need to processes these definition files using the Google provided Protoc tool to generate useable classes that can de-serialise our data (https://github.com/protocolbuffers/protobuf/tree/master/java). You can either use the tool standalone or use a plugin for your favourite IDE. Once we have our classes we can now import the Protobuf dependency (implementation ‘com.google.protobuf:protobuf-java:4.0.0-rc-2’) and get to work decoding our TAK protocol.
This is actually straight forward, thanks to the work that Protoc has done for us. We can simply refer to the top most class of the TAK message (Takmessage) and call its parseFrom() method, passing in the modified ByteArray we generated by splitting off the header.
private fun deSerialiseProto(payload: ByteArray) {

    try{
        val tak = Takmessage.TakMessage.parseFrom(payload)
        println("TAK Protocol 01 message: $tak")

    }catch (e: Exception){
        println("Error De-serialising : $e")
    }

}
Now if we fire a TAK protocol message we should get the following output, indicating success!
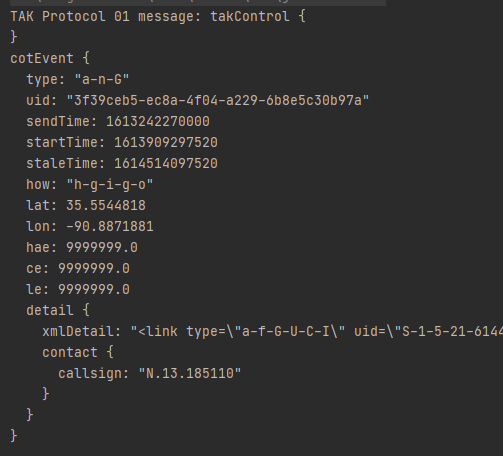
Due to the power of object orientation, we can now access any of the cotEvent fields directly, i.e If we want to extract the call sign;
tak.cotEvent.detail.contact.callsign
Or;
tak.cotEvent.detail.xmlDetailBytes
If we want to access the XML detail that is attached in order to parse that XML for more specialised messages.
I’m currently working on an open library for parsing TAK protocol and will hopefully have that up on Maven for open use. Hopefully we will get that up and live within the next couple of months! If this has been of use to you please consider signing up to become a Patreon on the link below.
