
As a follow on from Developing ATAK Plugin 101, this post will put some bones and sinew on the skeleton of our Hello World Plugin. I must make one confession upfront – I am not a professional developer, I can hack code around and make things work, but please look away if my code hurts your eyes!
For this blog I will start where we left off in the previous example, our Hello World app. From there we will explore what makes a plugin work and some of the functions we can call to interact with the ATAK map and underlaying data.
Plugin Structure
If you are anything like me, you have probably followed the SDK setup guide, have Hello World working and now….. ah, what in the name of all things Android do I have in front of me?
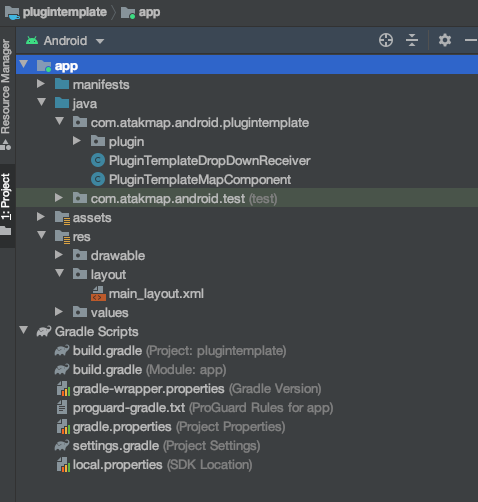
Starting with the obvious stuff – as we can see from the above screenshot we have two main Java files which we will use to buildout the plugin. DropDownReceiver and MapComponent.
These are specialisations of Android Broadcast Receivers and are used to subscribe to System and Application events. One way to think of these is they operate similar to a Publish and Subscribe mechanism, allowing the plugin to both Publish and Subscribe to ATAK events and services.
From my reading of the provided PDF files, from the ATAK SDK, we should use DropDownReciever and specifically the onRecieve method inline for what we would use MainActivity for in an Android app. MapComponent is the plugin entry point for initialisation etc. (Thanks to Donodev on the TAK Discord for expanding my knowledge in this area).
The concept of lifecycles are very important in Android and ATAK is no different. When developing a plugin we have to be mindful that we are typically working within the different ATAK contexts and not necessarily the main Android ones. If we want to interact with the User Interface we need to ensure we are using the MapView context to conduct those actions. Use the plugin context if we want to process in our plugin context.
Kotlin
Now before we go any further, I am going to be using Kotlin as the language to develop out functionality. I never really learned Java and have recently completed a Udacity Kotlin for Android course. Kotlin can natively interact with Java and therefore should work fine for Plugin Development.
First thing to do is to convert some of our files to Kotlin in order to allow Kotlin development, fortunately Android Studio can do this out of the box;
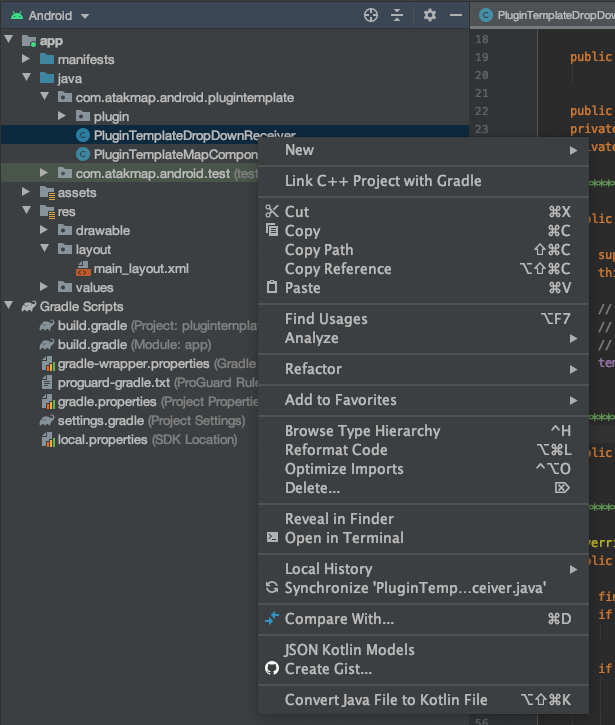
Right click on the DropDownReceiver and click Convert Java File to Kotlin File, when asked click OK, Configure Kotlin in the project and select all modules. Now repeat the same action with MapComponent once the project has finished re-syncing.
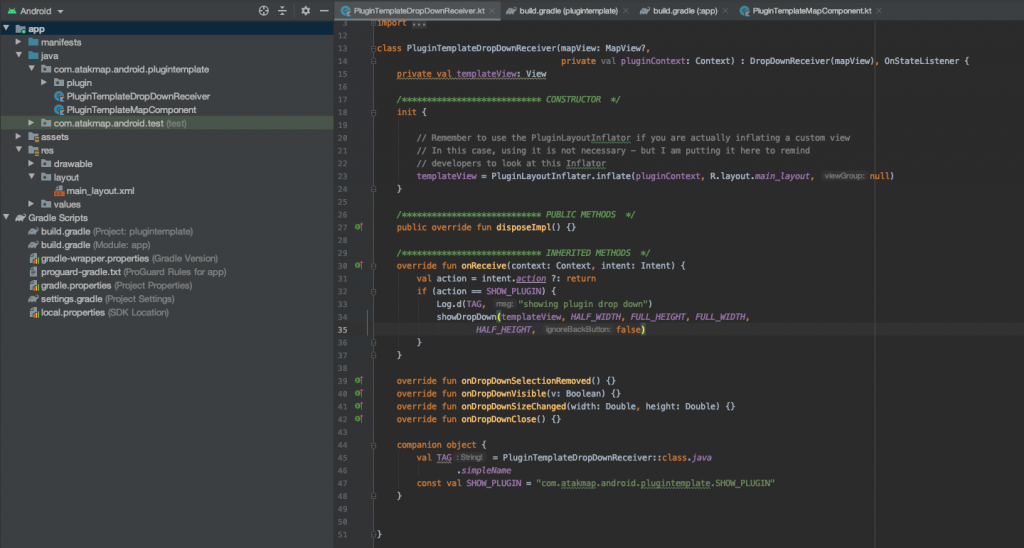
Due to the way the auto converter works, for some reason the Class constructer ends up at the end of the file, just move this towards the top of the class and it should look similar to this;
If we build and re-install the Hello World plugin should install and work fine, hopefully indicating we haven’t broken anything!
Building the App
So my example app will be using fragments in order to present the UI of the plugin. These are powerful ways of being able to rapidly swap UI pages and is normally a component used to segregate UI activities from back end app services.
Before we get too far, lets rename our Plugin, we can do this by going to res/values/strings.xml. this is a file that can hold fixed strings for our applications, a nice way of keeping these all in the same place.
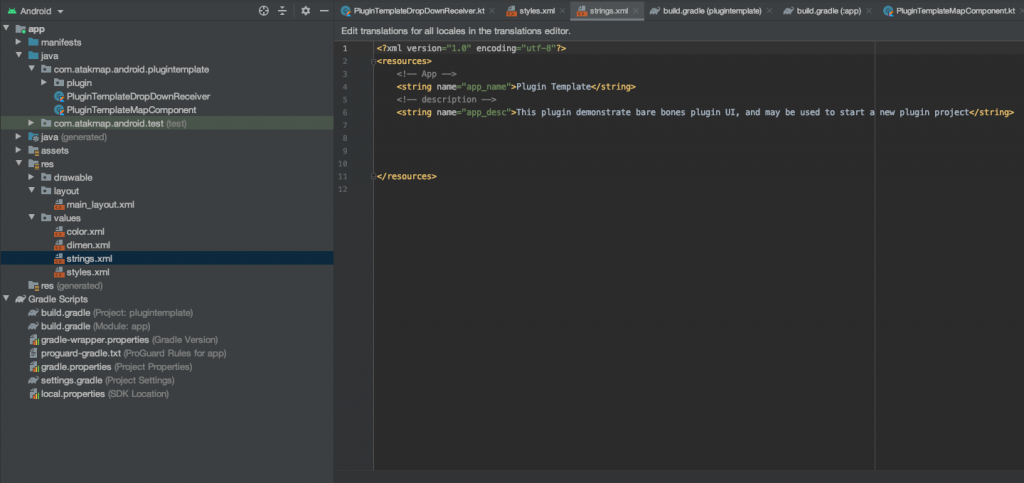
So go ahead and replace the “app_name” string to something imaginative!
Adding our UI
To build the UI we need to add a Fragment to our test app, we can accomplish this by right clicking layout and selecting New/Fragment/Fragment(Blank)
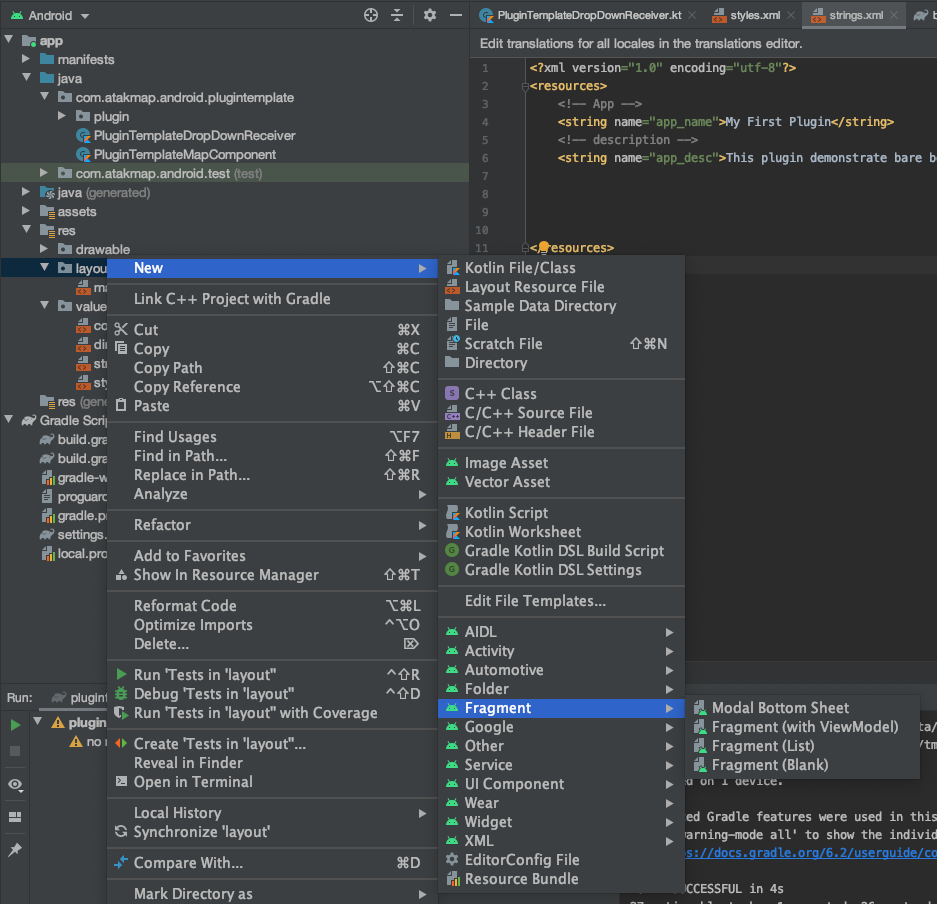
Now we can give it a name -> pluginMainFragment, ensure you remove the tick in the Include fragment factory methods and click Finish to add the new Fragment to the project;
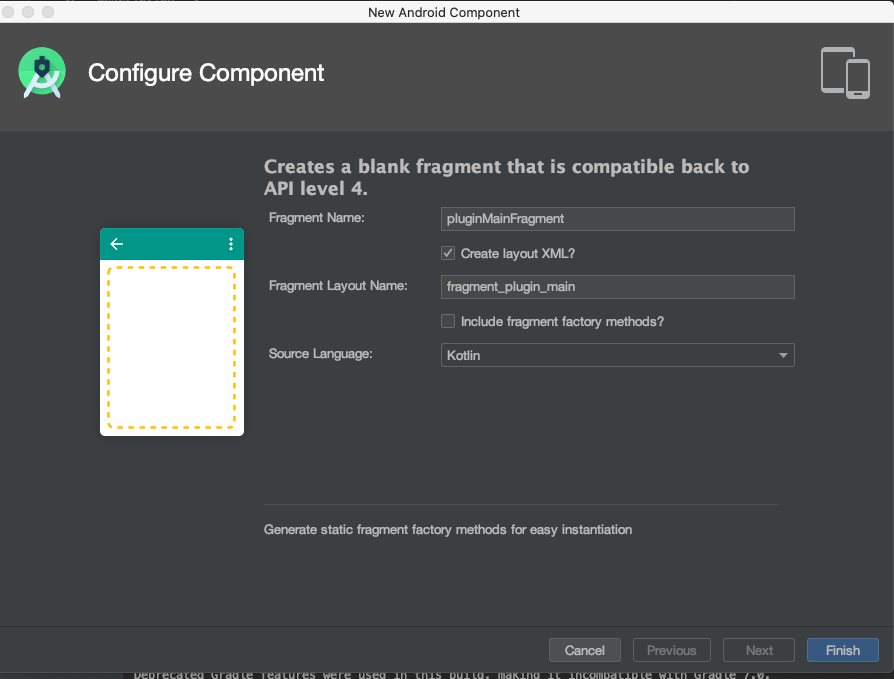
We now have pluginMainFragment class file under the plugin directory and fragment_plugin_main.xml under res/layout. The later file is the UI and the former is our place to code UI interactions.
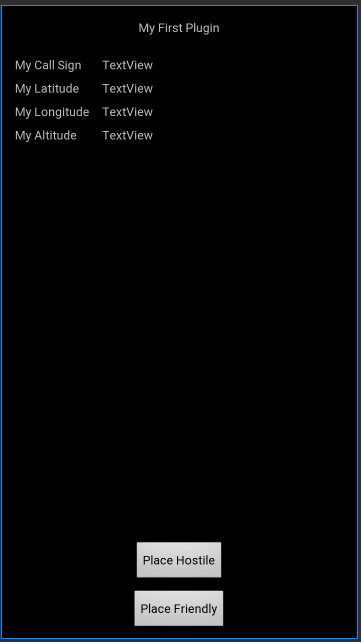
I am going to add a few items to the Fragment to illustrate the main use cases for the plugin architecture, first off assemble the following UI: I converted the Fragment to Constrained layout as that provides some flexibility for our layout (this is not strictly required, but Constrained appears to be the favoured layout for recent Android applications).
Building the Application Logic
We need to provide id’s for all the TextViews we want to place information into and for the two buttons. (I used very imaginative id’s of callsign, myLat, myLong, myAlt, plHostile and plFriendly).
Next we need to head back to our DropDownReceiver and inflate our fragment so we can view and interact with it in the applications. In the init block we need to initialise our new fragment;
myFirstFragment = PluginLayoutInflater.inflate(pluginContext, R.layout.fragment_plugin_main, null)Now we can tell the DropDownReceiver to inflate the Fragment on startup, simply replace templateView with myFirstFragment in the showDropDown command;
showDropDown(myFirstFragment, HALF_WIDTH, FULL_HEIGHT, FULL_WIDTH, HALF_HEIGHT, false)A inflated Fragment is all well and good, but we need to interact with it. For this example we are going to keep things simple and keep working within the DropDownReceiver. We add some initialisation for our TextViews and buttons on the Fragment;
val callsignTextBox = myFirstFragment.findViewById(R.id.callsign) as TextView
val mylat = myFirstFragment.findViewById(R.id.myLat) as TextView
val mylong = myFirstFragment.findViewById(R.id.myLong) as TextView
val myalt = myFirstFragment.findViewById(R.id.myAlt) as TextView
val swHostile = myFirstFragment.findViewById(R.id.plHostile)
val swFriend = myFirstFragment.findViewById(R.id.plFriendly)
val aleganceText = myFirstFragment.findViewById(R.id.hostileornot) as TextView
Once initialised we can make some calls to get information from the ATAK services;
val takCallsign = getMapView().deviceCallsign
val takMyLat = mapView.selfMarker.point.latitude
val takMyLong = mapView.selfMarker.point.longitude
val takmyAlt = mapView.selfMarker.point.altitude
And issue this data to the initialised TextViews;
callsignTextBox.setText(takCallsign)
mylat.setText(takMyLat.toString())
mylong.setText(takMyLong.toString())
myalt.setText(takMyAlt.toString() + "  ft MSL")
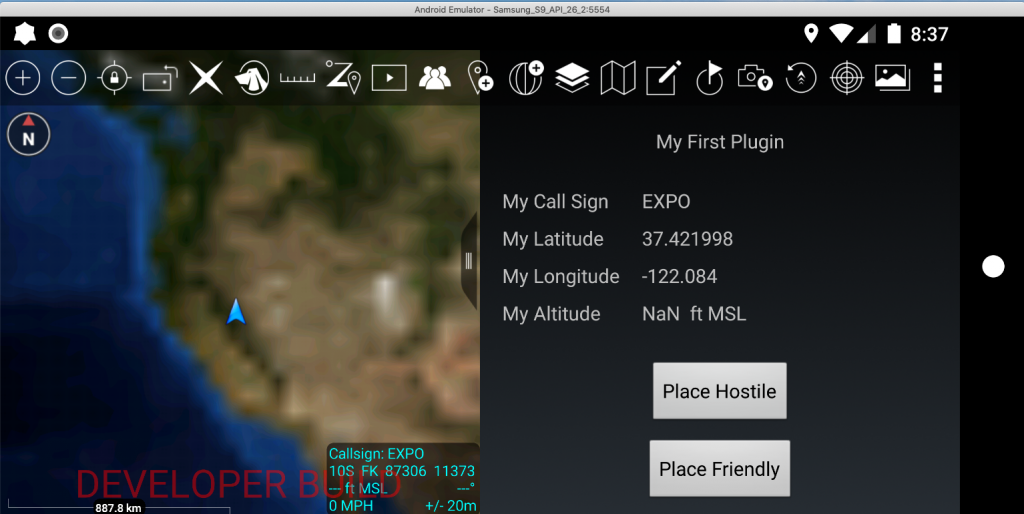
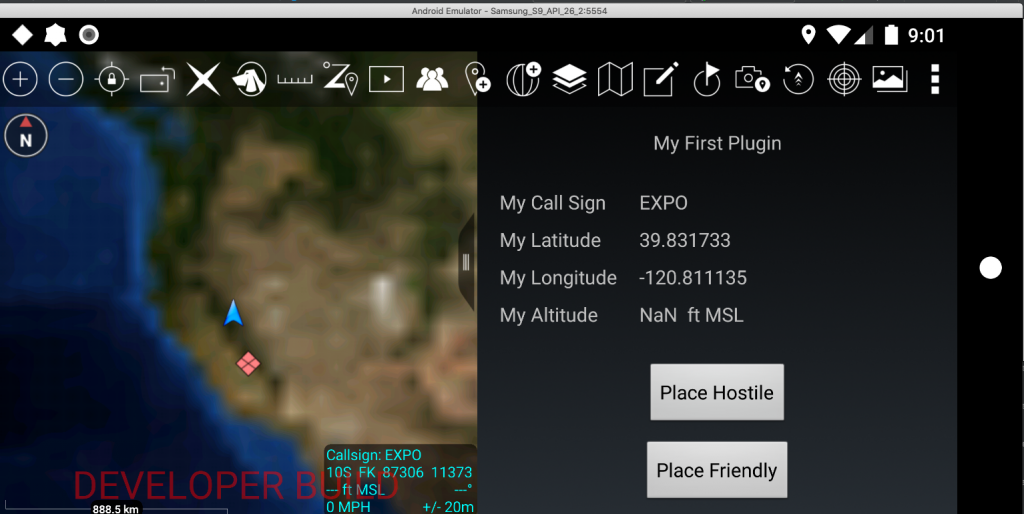
Now hit the Gradle Install debug task again and we should end up with a plugin that displays the following when opened (of course position depends on what you set it in the emulator or your actual GPS location if you are on a physical device);
Once we have that working, we need to get those buttons dropping COT markers on the map (given that’s what most people want ATAK for!) This next step may be a little strange, but I have a habit of pulling methods out to new classes where I want to reduce the amount of code in the main activity. I guess a benefit in the future would be building out a fuller Class that can manipulate the COT events in various ways required by different applications.
Generate a new Kotlin class file called positionmark.kt and initialise a new class, this takes the ATAK CotEvent and packages the steps necessary for drawing a COT marker. For this application I have used the CotMapComponent.getInternalDispatcher(), which I believe only publishes the COT event locally to the application. From my powers of deduction I assume the CotMapComponent.getExternalDispatcher() can be used to send the COT on the active ATAK network interfaces.
import com.atakmap.android.cot.CotMapComponent
import com.atakmap.coremap.cot.event.CotEvent
import com.atakmap.coremap.cot.event.CotPoint
import com.atakmap.coremap.maps.time.CoordinatedTime

class positionMarker(
           ){

    fun drawCotLocal(
                      // Constructors for the info we require when calling this function
                      lat: Double,
                      lon:Double,
                      hae: Double,
                      ce: Double,
                      le: Double,
                      uid: String,
                      type: String
               ){

        //initialise an ATAK COT object
        val  generatedCOT: CotEvent = CotEvent()

        //Generate initialise time
        val time = CoordinatedTime()

        generatedCOT.uid = uid
        generatedCOT.type = type
        generatedCOT.time = time
        generatedCOT.start = time
        generatedCOT.stale = time.addMinutes(10)
        generatedCOT.how = "h-e"
        //set the Geo Co-ords of the COT event
        generatedCOT.setPoint(CotPoint(lat,lon,hae, ce,le))

        //Write COT to map using internal dispatcher
        CotMapComponent.getInternalDispatcher().dispatch(generatedCOT)
    }

}
We can now call this class from our DropDownReceiver in order to plot COT markers, first off initialise some values;
//initialise some values to generate a COT
val plot = positionMarker() //Initialise our Cot plotting Class
val lat = 37.421998
var lon = -122.084
val hae = 0.00      //height above ellipsoid in metres
val ce = 2.00       //circular error radius in metres
val le = 2.00       //linear error in metres (height above target)
val uid = "test uid"
val friendly = "a-f-G-U-C-I"
val hostile = "a-h-G-U-C-I"
var type = ""
Now we can call our function with a pair of onClickListeners in order to fire the Cot marker, I included an increment function on the long to show the marker move every time we click the button. The jumps are pretty massive, but shows the functionality. If you change the UID it will plot a fresh COT rather than updating the previous marker;
   swHostile.setOnClickListener(){
                plot.drawCotLocal(lat,lon,hae,ce,le,uid,hostile)
                lon++ // Increment the Longitude every time we push the button

            }


   swFriend.setOnClickListener(){
                plot.drawCotLocal(lat,lon,hae,ce,le,uid,friendly)
                lon++ // Increment the Longitude every time we push the button
            }
Once again hit that Gradle task for Installing the CivDebug plugin and once installed you should be able to plot COT markers using the buttons;
Hopefully this gives someone a leg-up in terms of using the plugin SDK. I hope the growing TAK community of Discord and elsewhere can start building out some novel plugins and show the power of openly available tools!
I have published this demo app to a public Git repo, grab it here to have a play demo app .
